Can You Crack An Optimizer?
Well, I did.
I cracked it bad, so now I can show you a detailed 6.5 rebuild! YAY!
I cracked it so bad that there was a genuine chance that if I had missed it and went ahead with the initial build, I would have lost the whole #2 main web into the oil pan (yeah, it's happened before).
But, thank God that while bs'ing with a friend about the build, I happen to have the light just right and saw the crack had actually extended all the way down into the cylinder.
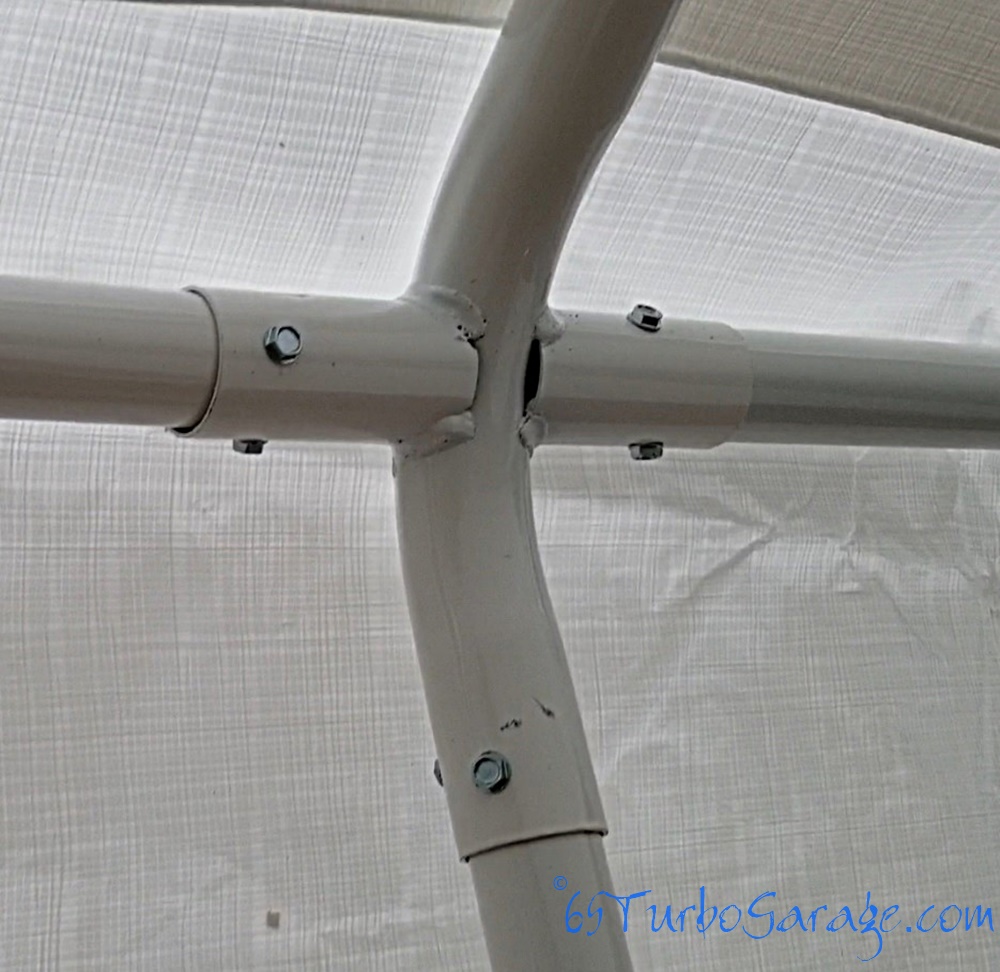
 A common place to find cracks is in the main web right down in line with the bolt holes
This is a picture of the number two main web from the outside bolt hole down towards and into the cylinder itself.
Crap, my first junk block is an Optimizer.
Yes, you can fix a block. You can weld them, and you can use a process called Lock-n-Stitch that is commonly used that is a permanent fix (I look forward to trying this out someday), but it is only good for fairly short cracks. What it really boils down to is that the cost of repairs can quickly become more expensive than buying a crack-free block and starting over.
- BTW, this covers a lot of information so can get a bit wordy. So just skip ahead if you ain't got time fo' dat!
What Is This "Optimizer" and What's The Big Deal?
Optimizer blocks and heads were designed and built by Navistar, the same Navistar that designed and built the Ford 7.3 and many others. And they crack too.
Without getting into some controversial details (people will argue about anything, won't they?), the Optimizer was designed by GM and AM General and cast by Navistar, or some combination of those, but they are a re-designed GM block with improvements to the cooling passages and added molybdenum in the block and more chromium in the heads (and hardened valve seats) to improve the cracking resistance of both. And from everything I've read and learned, it "solved the issue".
Huh, kinda like Arnold saying "the science is settled!" cause again, I broke it.
At least I can crack them. But then, my mom was right, I can break damn near anything.
However, to be clear, if you knew everything that I put this poor motor through, well, you're a goofball if you believe that Optimizers crack just like GM blocks do, because they don't. I had to go through a lot of effort and trouble just to get it to crack and I did it just for you, dear reader! (I refer back to my goofball comment if you believe that)
But waitaminut, let's back up some here...
The Story
(The story of a mans fairly short journey through semi-major engine failure and semi-total engine rebuild. )
If you've read my first blog entry, you know the details as to what brought me here and in this article I want to cover my 6.5 rebuild in detail and what work needed to be done in order to get me back on the road in as little a time as possible.

Yup, I had finally experienced something that so many others have been through. A major breakdown leaving me on the side of the road. I've been driving since I was 7 years old and have put over a half million miles on all different vehicles and have never had a core engine failure on me.
Everything else around it has made itself know over the years, radiators, injection pumps, tires, bearings, rocker arms, etc. But I never HAD to tear into the innards, every time I did, I WANTED to tear into the innards. I guess it's about time.
But really, if you punch a brick wall long enough and hard enough, something will crack. So let me go through some of the things that I did to this poor motor...
Recipe For Crackstruction
First was the assembly.
The motor was a military take out from Ted's and was in great shape, I would buy another from them again (as a matter of fact, I plan on it). But it has to be said that I didn't know the history of this motor. I don't have any reason to think it was a bad one, it had great oil pressure, the hash marks were still clearly visible in the cylinders and it still had assembly lube in parts of the motor so everything looked like it had very low miles and was in great shape. But who knows what kind of life it had before I got it? Who knows what kind of booger picker had been driving it and was responsible for it?
 Booger Picker
So I removed the heads to install ARP head studs and was reminded of a couple things that worried me a bit...
- This motor came out of a naturally aspirated HMMWV. This was necessary because the turbo versions had a center mounted turbo which has slightly different heads and wouldn't work with my truck. The concern here was that the pistons were not coated like the turbo versions are to handle the higher heat of the combustion chamber. But after a bit of research, I found the consensus was that they would would be fine. While that didn't really sit well with me, I went with it. Mostly because I was stuck with them. And in truth, they would be fine in an otherwise stock motor, but this thing wasn't going to be very stock.
- Also being naturally aspirated, the heads had some of the smallest precups made for these motors. And while this is one of those things that people don't seem to agree on, I believe the theory that they run hotter and certainly don't allow for as much power as the later design precups. This one did make sense to me but again, because of time and money constraints I was stuck with them.
 The Smallest "Square" Precups Hold In A Lot of Heat
The common theme here is heat and was exacerbated by several other major issues that all conspired in the destruction of my block and pistons.
1. I had bumped up the timing quite a while ago. Snappier throttle, more power, crisper running, and lower egt's, all things that make me feel fizzy inside. But, as I was researching engine failures to find a cause to this mess, a few pictures of some other's failed pistons caught my eye. They looked a lot like mine.
- They had obviously been heated to an extreme degree
- They had spider web cracks too
 Spider cracked 6.5 piston tops from high heat and advanced timing
Advanced timing was identified as the culprit.
2. This was all before I solved my overheating issues with the standard cooling mods and the Champion radiator so all the heat attacking the piston tops wasn't able to be removed with a sub-operating cooling system.
3. The first day I had it running, I found out that there was one screw that I didn't tighten. I found that out when I went up my first steep hill and found out that the screw was on the top radiator hose. Bam, hose comes off and I subject my motor to it's first thermal shock the first day.
4. The injectors I ended up using were rebuilt by a local shop and I was always unhappy with the injectors. They were dirty, obviously poor rebuilds, and weren't even reassembled properly. I'll go into a little more detail why this is significant when I get to installing the new badass injectors.
And let's not forget that this motor was hydrolocked at one point.
I can almost hear some guys screaming "WHAT? You mean I can't hydrolock my motor, overheat and over advance the timing, run bare aluminum pistons, shove a bunch of burning fuel through crap injectors and a tiny hole with a poor cooling system without this piece of crap melting down?!! I'm buying a Cummins!!". (They'd have to take a breath in there somewhere and clean the spittle off the corners of their mouth.)
Oh...
And then there's the water methanol. : )>
Actually, the water/meth is probably what helped it not melt down sooner under a heavy load. It actually cools everything down and helps prevent preignition.
But Wait! There's More...
The last bit of damage (what? there's more? Yes, leave me alone) was also caused by me (I CAN build good motors, honest!).
When installing timing gears, you have two idler gears that transfer the rotating force rather than a chain. Those gears should just slip right in between the crank and cam gears as you wiggle them back and forth to get them lined up. Well, I couldn't get them in so it was decided that my block may have been line bored in the past that changed the clearance relationship between the cam and crank requiring a smaller gear. So I got one coming, installed it, and moved on.
Some time after getting the truck back on the road, I got to thinking that I had not removed my flywheel lock when I installed the gears and so couldn't get the right wiggle to fit them right, which meant that I likely had an idler gear that was too small.
Sure enough, when I removed the oil pan at the start of the teardown, there was an ear to a circlip at the bottom of the pan. Where could that have come from?
Yup, the gears had fit so loose that they really worbled around in there, eventually broke the clip, allowing the gear axles to hork out the housing they ride in and some metal to get into the bearings and causing a big trench to be gouged out.
Luckily, no damage to the crank, rods, or any other hard part could be found.
 Loose DSG Timing Gears on 6.5 Diesel
I have to admit, I am pretty surprised at the amount of cracking the block showed though. But with the pressure of hydrolocking, advanced timing, and how horribly out of balance these engines normally are all coupled with the fact that I had no opportunity to magnaflux this block to check for cracks before the build, I guess it's not too hard to accept.
Here's the amazing thing...
You know those annoying self-help, "think positive" types? Well, I'm one of them.
I caused this whole trip starting with a blown head gasket but everything that you read above was happening without me even knowing it.
Think about that. When something bad happens, some people will say that it's an opportunity for something good to happen. I was kidding a little bit about the think positive thing, normally I get pretty bent out of shape when these things happen, but man, I hate to imagine what kind of carnage would have happened if I hadn't caused the head gasket issue and it had grenaded some time later on it's own.
Like I said above, the crank would likely have ended up in the oil pan.
OK, So What Now?
Well, we start with not making the same mistakes and we do that starting with the block and I'll use every trick that I know to prevent any cracks.
I had to decide how far into the motor I wanted to get. Few of us have all the time and money in the world to do exactly what we want to our motors when it comes time to work on them so everybody has to decide their own balance. Don't let anyone push you into a place that you don't want to go, you have to decide for yourself. But do give it some real thought.
My main job is balls to the wall or none at all and I've been in the none at all for quite some time now, it is time to go balls to the wall. That means I don't have the time to do a ground up rebuild, I need to get back to work.
Well, that's what I thought at first.
As it turns out, like I said above, the block ended up being junk. So don't ever get set in what you think you need to do. Always be ready to fine tune your plan a bit.
The "none at all" part of my job was starting to kick my butt, I didn't have the total funds to do a full rebuild. For me, this is what credit is for. I rarely use credit for anything so I had that available for me to get this done. But now, time to pay it off!
I will probably not have a functioning shop to work in for some time so I needed to get this project done before full winter hit.
6.5 Reboot
The plan
- I'll reuse the cam, crank, and rods
- I'll fix the problem areas and improve others while I'm in there, there were some things that I wasn't able to do when I put this motor in and it's been bugging the heck out of me
- And I'll do something that I'm really excited about and that is balancing. I'll get the whole rotating assembly balanced so it'll run smooth as buttah! I firmly believe that this will go a long way to help prevent any block cracks
- I wanted to completely remove all reasonable possibilities of piston destruction, and to do that I went with a quality piston that had a full complement of the best ceramic coatings that can be found
- With all the fuel and turbo mods that I have on this motor, I wanted the bigger diamond style cups. Since the diamonds have been discontinued, I couldn't just order them and be done with it so I found that the time and money situation kept me from going full diamond at this point, but I had a set of double square "T" precups on hand from a turbo '93 that are a big improvement over the old NA precups that I was running
- I will still have the timing advanced, but only just a bit... Gotta keep that fizzy feeling
- I had already completely solved my heating issues starting with the standard heating upgrades and ending with Twisted Steel's thermal dispersant coated Champion radiator.
- In place of the crappy injectors, I got the best ones for the 6.5 that you can get
- I tracked the hydrolock issues to Faulty AEM nozzles so I replaced them with much better Devils own nozzles and solenoid to completely eliminate the possibility of it happening again
- I'll install Leroy's timing gear set. That's one of several "lifetime" improvements (if you install them right) that I'm not willing to give up
- With long term durability in mind, I'll have the main bearings coated with the same ceramic dry film lubricant as the piston skirts. This will make them slicker and hold the oil better and allow for tighter clearances which translates to a longer time before the bearings wear to the point of causing low oil pressure, forcing another rebuild
O.K., so that's where we're at and where we're headed!
Enough Yapping, Let's Get To The Work!
Tools
|
Parts
|
Material |
- As a reminder... This is the process on my '93 so yours may be a bit different.
- To start, I'll touch on some prep in the event that someone is in the same, wonderful place as me and doesn't have a real place to work. Since cleanliness is so very important when building a motor, having everything under cover is a must. Not to mention the coming weather. So I invested... and I use that term very loosely, in a cheap, metal pole, car port structure thing that is quite frankly, a piece of crap. But, with the improvements that I'll make, it will serve the purpose well enough for little money and very little time.

- I bought a carport tent shelter for around $280 (at the time) and used self drilling screws at every joint when I put it together, then I weighted down each leg. Strengthening it this way has helped it survive frequent wind storms so far. The only real issue will be if we get a significant amount of snow, and then I will just have to be diligent in keeping the roof clear.
Otherwise, it will work fine for getting this motor built.
- And for a workbench, I just used two sawhorses with plywood spread across.
- I loaded all this onto my WHaTS that you can see here. Just think of it as a Transformer wheelbarrow on steroids, it's an amazing tool that really helps a lone worker multiply what he can do.
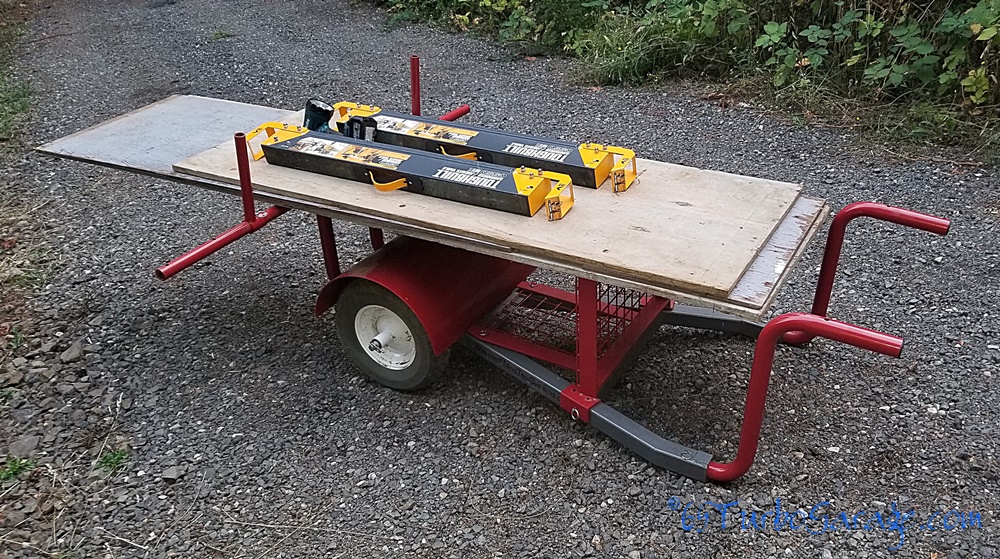
You can see my review of it on my other site here if you're interested.
- Let's Start At The Very Front

Tip!
After removing a component, put every nut, washer, and bolt back where it came from. That way you have less opportunity to lose them.
- There are two things that you can do to make engine removal much easier.
- Remove the radiator core support
- remove the passenger side inner fender
One I've done many times, pulling the inner fender is something that everybody should be able to do as it makes so many jobs much, much easier.
The other I've always wanted to do but it seemed way more than I wanted to get into. But I was determined to figure it out this time and boy I'm glad I did. It was a lot easier than I thought it would be and man, does it make things nicer to work on.
- We'll start with removing the radiator core support
And before we move further, safety.
- Loosen all the front lug nuts, jack up the truck, and put some good, quality jack stands under it. Put them back farther on the frame than you usually would so you'll have room for the engine hoist later. Pull all the lug nuts off and the wheel, then put all the lug nuts back on the studs so you don't lose them and they will protect the threads from getting whacked. Roll the wheels out of the way and stack them somewhere.
- Then we'll pull that inner fender
- Now you are ready to pull that motor free!
The Monsters Free, Let's Tear It Apart!
- The first thing I wanted to do was find out the extent of the damage from the head gasket blowing, but I was about to find out about way more than that.
- If you are keeping your bottom end together then it's a good idea to start getting things cleaned up now so grab a vacuum and start getting all the garbage off of the engine like wonderful mouse nests, yay!
 Clean everything like the mouse nest in the valley, YAY!
- The first step to pulling your head is to remove the valve cover. So pull the frame that holds the brackets for the injector lines (and the heat shield on the passenger side) and anything else in your way.
- I would suggest getting some sort of system for keeping nuts and bolts together and identified. I used a combination of ways, from putting them back in the holes (the best way, I think) to
- Metal cans
- Jars
- Sandwich bags
- White electrical tape
All with the location of where they go written on them.
- After pulling the valve cover bolts, you want to be very careful not to bend the crap out of the valve cover to get it off. If it was installed correctly (without gaskets) then it will have been glued on with some sealant that we want to cut through before pulling on the cover.
- Using a small scraper and a mallet, get the scraper worked under the cover at the top corner keeping it flat with the cover without prying up on it. Then just start tapping with the mallet along the sealed edge. I also use a small screwdriver to follow behind the scraper so it doesn't get pinched and to easily get the scraper back in if it falls out.


- Work your way down either side and then when that's all free, you can give the cover a gentle pull to see if it's ready to come off. If not, just cut through the sealant a bit more until it can be pulled free without bending it.
Ok, valve covers are off!
- Next we pull the rockers.
- Put them in a box with the location written on it like, "drivers front" or some such thing.
- It's not a thing that will immediately blow up your new engine, but you really do want to put all valve train components back in their original spot.

- With the push rods, if you pull one out and look at the two ends, you will notice that one has a golden color to it. You may have to look right where the ball end meets the push rod itself. That golden end is hardened and has to go back together the same way you take them out or else you will have major wear. So like the rocker arms, make sure you label them well when you take them out. Some people just shove each of them through holes in a piece of cardboard with the position written on it.
- Now the moment of truth, lets get the heads off.
- In a general cross hatch pattern and just a little at a time on each bolt/stud, start loosening the head fasteners. You can use the same sequence as you use to tighten if you want and don't just pull any one completely loose right away.
 GM 6.5 Diesel Head Torque Sequence
- When all are out, you can throw them away if they are the stock bolts. Of course, ARP studs can be reused. Do NOT reuse the bolts, they are stretch to yield so they literally stretch and can't tighten the same more than once.
- Btw, there are 17 fasteners so make sure you have them all out before reefing on the head. Watch my video to find out why. : )>
- On the lower corner of the head, you'll see a space where you can stick a screwdriver or something to wedge the head up to get it broken loose.
 6.5 Head Location To Pry Off
- It helps to have a good hand hold for the head so reuse one of your bolts for the alternator, ac compressor, or whatever that will fit into the threads on the front and back of the head.
- Have a clear path to your workbench, grab hold of those bolts and lift her off.
You will likely have coolant spill a bit so be ready for that with a bucket and floor dry.
- Now repeat on the other side and you're ready to start getting a good look at the damage!

The Inspection
First I'll say this. Always expect the worst. And then figure a bit more than even that. Not that life always has to suck, but there just seems to always be just a bit more damage than you think at first when doing automotive repairs.
For me on this project, I expected to just put new head gaskets in and hit the road but as you read above, I was in for more than just an easy fix, oh yes I was. But let's find out how deep we have to go...

- At first I saw no definite catastrophic failure so I held my high hopes. However, after cleaning the cylinders of the coolant, oil and smutz, I could clearly see pitting at the base of every piston. I still don't know why it was at the base but it had greatly eroded down towards the ring landing. The only thing that I can think of is the spectacularly crappy rebuilt injectors that were likely dribbling fuel instead of spraying a fine mist and creating terrible hot spots. I would definitely be having a long talk with the long lost, and greatly missed Kris Stratton about his top-o-the-line marine injectors this time around. (no, he's not dead, never mind how he looks)


- I also confirmed that as mentioned above, every piston had spider web looking cracks
from the center out to the edges. This, along with brown and black
discoloration on the underside of the pistons told me that these had
seen some real heating.
Why would that be? I had gotten it
hot a few times while doing my coolant mod and Champion radiator
articles but not by very much and not for very long. And really, the
exhaust gas temps is likely where cooked pistons would show and I hadn't
seen anything crazy there either.
 Gm 6.5 Diesel Piston With Spider Cracks
- Well, as my Patreon supporters learned some time ago from my patron only article, there are consequences to putting a turbo on a NA motor and the biggest is cooked pistons. Also, remember that this was a military take out so it had very likely seen some hard use in the middle east and it's high temps.
- So, once I had stopped crying in my beer and accepted that I'd be buying a new set of pistons, I moved on to the heads.
- No major destruction. So far, so good. That means they would likely be able to be saved.
 6.5 Diesel Heads Cracked Between Valves
- The fact that all the valves were seated fine suggested that they were likely in good shape too but I could see immediately that pretty much every cylinder had cracks between the valves, which was expected and not a big deal. Any decent machine shop that has worked on 6.5's should be able to perform the common fix of sleeving the water jacket behind the cracks and Portland Engine Rebuilders was very capable for me. Many people actually do this as a preventative measure before the installation of new heads which makes total sense to me. We know they will very likely crack anyway so just get the sleeving done at first and you never have to worry about it.
- Other than that, we're good! So on to pulling the oil pan and getting a look at the crank situation next!
Removing Passenger Side Head and Inspection
Removing Drivers Side Head and Inspection
Let's start digging down to the bottom end...
- Just make sure all your fluids are drained as much as possible before you start on the oil pan. Have a drain pan below and maybe some absorbent handy.
- Give her a spin on the engine stand, just enough to let the coolant drain out of the passages below the cylinders.
- After she's drained, use a 10mm socket with long extension to start pulling all the bolts loose.
I do two things to make it a little easier...
- I loosen them all with a ratchet first, then use my Makita to pull them all out
- I leave one in the middle to pull out last so it will hold it steady for the rest
Of course, you can flip it all the way over first too, whichever.
Exposing Our Bottom
- I also pulled my block heater out to put a heavy duty 1000 watter in while I was there. These can be a real bugger to get to so do while it's staring you in the face...
6.5 Block Heater Comparison and Install
We'll be needing to give this thing a real good look over so get yourself a good light source, preferably an LED, they have a very bright, white light that makes it easier to see defects. I prefer a small flashlight to be able to really get into the little nooks and crannies. This is a good set that charges by usb and takes several different battery types, is water proof, and if it has a decent switch (time will tell, switches are the weak point for many otherwise good lights). I did have an issue with the switch on my flashlight but that's why I like to deal with Amazon, they have a great return policy.
And Looky There, The Flashlight Worked
Well, I don't think it surprised anyone since I started this long article asking if you could crack an Optimizer and here we are, we finally made it.
-yay me- : |>
Gallery of Crackstruction
(click for larger image)
 |
 |
 |
 |
 |
 |
 |
 |
There were more cracks, but you get the idea.
At first, like mentioned earlier, I was just going to run it, so I started the disassembly with that thought, but as I looked closer at the cracks, they were just way to big for me to move forward with. There are options like Lock-n-Stitch that is a permanent fix or welding but I figured if I'm going to tear the whole thing down, I might as well start with a new(ish) block.
And I'm glad I did. the Lock-n-stitch kits are pretty expensive (I know the head crack repair kit is $400) but I found a 506 block at Engine Rebuilders Supply in Troutdale, Or. for $500. They magnafluxed and guaranteed it to be crack free and if I found any cracks while building, they would replace it.
Ted King at Portland Engine Rebuilders recommended these guys and since Ted is good people, it doesn't surprise me that the people he recommends are good people too.
Btw, I can hear some of you screaming
"but 506 blocks are crap!". Well, maybe yes and maybe no. You see, I
have it from good authority a theory that goes something like this...
Early 506's were crap. Mostly not seasoned properly causing them to
crack easily. However, between then and when GM to finally turned
production of the 6.5 over to GEP, they continued to improve the blocks.
There seem to be much fewer blocks cracked in the later production
years of the 506 block along with some other telltale signs suggest that
the blocks may have seen some Optimizer improvements before GEP took
over and mine was a late '99 model casting so I hoped that I had a good
one.
It could be that GM finally started properly
seasoning their blocks but regardless, I'm going to be using some
techniques and parts to help prevent cracks anyway.
Look at
it as my sacrifice to you, I may have gotten the worst block and may pay
dearly for it, but it'll give me a chance to find a way to prevent our
blocks from cracking. I think it's worth it.
That, and it's the only block they had. : )>
But First
We still need to get this pig apart.
-We're staring at the rods and the caps need to come off to get the pistons out so let's get to it. Nothing special, using your 15mm ratchet just pull a cap off. Start at one end, rotate the motor so the cap is up towards you as far as it will go and start releasing the torque on the nut. With anything torqued, I try to pull off by gradually loosening the torque, alternating between bolts. Working the cap off can be a chore sometimes because they are knurled but just wiggle them back and forth and they should pop off.-
- We'll be getting these rebuilt so no need to label them at all, just keep the caps with it's rod. But if you happen to mess them up, just match up the numbers stamped on the cap and rod.
- With the cap off, rotate the engine to push the rod and piston out as far as it will push it then keep rotating to pull the crank out of the rod bearing journal. Grab on to the rod to keep the studs from scraping along the crank, we don't want to add to any damage. Then grab the rod and push it and the piston out of it's hole. If there is a large ridge at the top preventing the piston from coming out, very lightly sand it down just enough to get the rings past. If the block is garbage like mine, just ram-rod the piss out of it cause it doesn't matter anyway. Continue with the rest of the rods and pistons.
- You'll want the pistons separate from the rods for the machine shop to do the things they do so you need to pull the pins. Unfortunately it's quite difficult to put it into words so just check out the "Part 6" video below where I show you how I did it.
- Basically the clip needs to be worked out being careful that it doesn't go flying across the room and then the pin can be pressed out after. Keep everything together, clean with a rag as you go, and don't lose the clips, if you're getting new pistons, sometimes they may not come with them.
- Ok, there you go! You're looking at the heart of your motor. These are the things that pull air in through the intake valves, compress it with the fuel, causing it to combust, and then push out the exhaust valves producing all that power you use to do all those things YOU do.

Next: We inspect and measure the pistons so we know what to order!