Installing ARP 6.5 Head studs
Installing ARP 6.5 Head studs is a must for consistent, long lasting high torque and horsepower in your GM diesel.
The first thing to look at when looking to get more power out of your 6.5 (after supporting mods like a larger exhaust (double check for fit on your truck), EGT and turbo boost gauges is turbo boost. Raising the boost will provide the cylinders with more air, which will allow for more fuel which makes a bigger bang which is more power!
The problem is with a higher PSI boost and a bigger bang comes more cylinder pressure which can blow the already-prone-to-blow head gaskets. Properly prepped and torqued, the stock torque-to-yield head bolts will seal just fine under normal driving conditions. But you’re not normal. If you were, you wouldn’t be here.
Enter the ARP head studs.

Made from the highest grade of 8740 chromoly steel (there are four grades), ARP studs were the first racing specific fastener made, have been in more race cars than any other, and are still the best. If you need to hold a motor together under any circumstances, ARP will do the job. Here’s a great article on how they are made.
We Want No Leaks!
There is one specific thing that we, as 6.5 owners need to pay attention to. ARP head studs have been known to leak in some installs. If this happens, coolant will get past the studs and into the heads where it will drain down into the oil pan, get picked up by the pump and distributed with the oil. You can see how this will quickly cause damage to crank/rod/cam bearings, rocker arms, etc.
Now, I will say this; you know as well as I that some people will only go out of their way to report bad things. Which is understandable here, they are mainly reporting so that they may find a solution. But we have to take into consideration the vastly larger numbers of people who have installed these studs with no issues. It can be done and here is how I went about it:
|
Tools: |
Parts:
|
Material:
- Brake Cleaner
- Degreaser
- Blue Loctite
- GM Sealant #12346004
- ARP Thread Lube (comes with the studs)
- Black RTV
- Rubbing Alcohol
And so we begin
- First, and most importantly you cannot have clean enough threads. Use a 12x1.75 tap to clean all the crud out of your threads. I have tried a chaser tap but it really left a lot of crud behind so I stuck with a regular tap and still had a very tight fit. Then spray liberally with carb or brake cleaner and swab as best as you can with a cotton swab. I even went one step further and soaked a cotton swab in rubbing alcohol and gave them several more swipes. It seemed like I got something out no matter how many times I swiped, so clean as much as your patience will allow and then just a little bit more. Then go get a beer to reward your perseverance.
Intro To Block Prep For ARP Head Studs And Fel Pro .010 Head Gaskets
- The next step in the cleaning process is to get the hardware clean. As I was cleaning the threads, I let the hardware process using one of the best purchases that I’ve ever invested in. This ultrasonic cleaner is GREAT for really getting your tools, parts, hardware and whatever else that you can fit into it incredibly clean with very little effort. I just put a little degreaser into the water, turned on the heat and let them go for about 20 minutes. Btw, this is a final clean after you have removed any major crud off of any stuff if you are cleaning old parts or tools.
Tip!
You may want to thread all the studs in dry once just to make sure that they aren’t hanging up on anything.
- When you are done cleaning the threads, wipe the hardware down with a clean cloth (you may want to rinse them in clean water but I didn’t) and you’re ready for the install. Btw, I used my fingernail in the cloth and turned the stud to clean the threads out real good. It’s a little tiring, but you can’t skimp on the cleaning process here.

- Cleaning the block and head surface can be pretty straight forward depending on how crudded up your engine was. If you’re doing a complete engine rebuild, you’ll already have a very clean surface on both so just a good quirt of the brake cleaner and a wipe down with a clean rag to make sure that there is no oil residue will do you. If you have pulled your motor just for some upgrades or are putting in a used motor like me, you may need to do some cleaning. As shown in the video, I just used a regular scraper and some brake cleaner. The scraper gets off the bulk of the junk and the brake cleaner cuts through the oil and old gasket material pretty well. Having a good shop vac handy is good to get any stuff out of any holes that it doesn’t belong in. I had old gasket material falling down into the cylinders that the vac pulled right out. By the way, the head locating pins actually pull right out for cleaning (you may have to work them a bit) and can be replaced if they are really screwed up bad (I haven’t found a part number yet. I’ll report when I do).
Special thanks to my friend Will who took the time to work with Fel-Pro, Mahle/Victor Reinz, and Permatex to get clear information on this subject!
Tip!
Some new coolants like Dexcool are known to have chemicals in them that can eat away at your stud sealant so stick with standard ethylene glycol green coolant.
Next to cleaning, the other key to a leak-free head stud install is the sealant that you use. Some have successfully used blue Loctite, but recently more exact technical information has come from Fel-Pro, Mahle, and Permatex.
From them:
Some sealants can damage the sealing surface on the Fel-Pro so stick with the GM sealant listed above and don’t get any on the flat surface of the gasket. They have a special kind of Teflon on the surface that can experience a chemical breakdown when in contact with sealers.
Mahle/Victor Reinz will not be harmed but do not get it on sealing surfaces since it won’t withstand compression forces.
Cometic will not be harmed as well because they have a type of Viton coating on them but doesn’t need it. And thousands of high powered drag cars agree.
Considering all the stories that I have heard and how important that it is to get them sealed I used the GM recommended sealant #12346004 on my first motor. It’s spendy but the way I look at it is if this $22 will solve a big issue and save me thousands of dollars of potential repairs, then it’s a total no-brainer for me. I had no leaks in that motor.
In my current build (2019) I considered using something that I didn’t even know about but has been used with great success on every sealing surface of an engine including ARP studs called Right Stuff. But recently I received news of an even better sealer. I am going with a new Permatex sealant that was just introduced in June of 2017 called Optimum Black (not Ultra Black). It has a 500* temperature rating and is more flexible than Right Stuff and so will withstand higher extremes and stay sealed against the threads and stud.
- So, you have everything as clean as you can get them;
- the threads in the block
- the studs
- the hardware
And you have
- the proper sealant at the ready
- the ARP thread lube ready to ensure proper torque
- the block prepped
- your prepped head sitting ready to go on.
Tip!
New design optimizer heads with better metallurgy and improved coolant passages are available at a great price from LeroyDiesel.com
- Now you’re ready to start threading the studs into the block. Since there is movement at the threads when you apply final torque to them, you want to do the next steps without waiting between the steps to ensure you are not torquing after the sealant has set. You don’t have to be in a hurry, just do every step in a row until the head is torqued.
You’ll see that the studs have a hex head (Allen) hole pressed in to aid in the install, however it is not to be used to put any torque on the stud when it seats. They are meant to be snugged down only hand tight. (Some guys have used a wrench to snug them up a bit and had good success)

- So, apply a bit of the GM sealant around the whole circumference of the stud and thread it into the block. Get it nice and snug (again, you can use the allen to ensure that it is totally seated, but don’t put any real torque on it).
- Likely you’ll see after inserting the stud that the sealant has built up so wipe it off with a clean rag and you’re done with the first stud.
- Repeat with the remaining 16 studs and you’re done!
- Remove the Fel-Pro head gasket from its package being careful to only touch it by the sides. You don’t want to get any kind of oils on its surface.
Tip!
One of the best combinations of mods that you can do to a 6.5 is to put in Bosch Duraterm glow plugs, a manual glow plug controller and thicker head gaskets. Lowering the compression ratio will make your engine last longer but make it harder to start in colder weather. A manual controller with a timer will allow you to run longer glow times to start quickly and Duraterm glow plugs are self-regulating so they won’t blow up or swell.
- Slide the gasket down onto the studs.
- Carefully slide your heads down onto the studs, being careful to not damage the head gasket. A friend to help makes this a much easier part of the job. Or if you don’t have any friends, find someone you don’t like and pay them. : )>
- The next steps are a bit of a pain and messy but it’s the best thing that I could come up with to prevent leaks as much as possible…
- Put a bit of the GM sealer on the bottom of the washer
- Put a bit of sealer on the top of the washer
- Slide the washer onto the stud
- Put some thread lube on the threads (Just a line up either side will do. Adjust as you go along to each one to prevent a total mess)
- Thread the nut on hand tight
- Repeat with all sixteen remaining studs cleaning up a bit as you go.
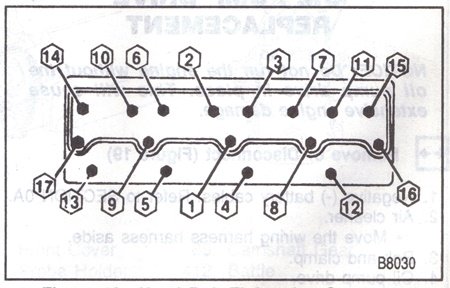
- Starting with the number one stud (refer to the picture below or the PDF instructions here) torque to 30 ft/lbs.
- Repeat with all sixteen remaining studs.
- Again in sequence from one to seventeen torque all to 60 ft/lbs and again to 90 ft/lbs.
- Technically you’re done with the torquing here. But at one time I had a set of instructions that showed (if I recall) 100 ft/lbs with ARP Thread Lubricant and 120 ft/lbs without so that left me with a dilemma. Which do I do? I decided to split the difference. If it called for 90 but I know I saw it to 120, I decided to go to 110. Others have used this limit as well and it’s worked fine so I’m sticking to it until something shows me I should do otherwise.

Congratulations, your head studs are in! Repeat with the other side and you're good to go.
Now go boost that fuel, put an A-Team turbo on it and enjoy the crap out of all that new power!