Changing the Starter on your 6.5 Diesel
Changing the Starter on your 6.5 Diesel doesn’t have to be a difficult job. We're going to show you how to go through the proper steps to get the job done quickly, safely, and easily.
Diesel trucks need high compression. The whole combustion process is based on the compression of fuels. But even so, with compression as high as 21:1 in our diesel trucks, we are dealing with much more than most other diesels that are as low as 17:1.
This means we absolutely need our starting system in top shape to overcome that compression and get the motor to spin fast enough for it to fire, especially in the colder months.

I talked with John Faddis at Quadstar Tuning recently and he told me that he tested 3 different high performance starters to find the one with the right qualities that would best spin these rigs with more than enough power to fire them up.
He wanted things like
- Made in the U.S.A.
- It had to use the bracket support
- It had to have a decent warranty
- And of course, it had to have plenty of power
Which led him to the XDP gear reduction starter. You can check out the specs and get one right from his site.
In addition to a strong starter, we need a couple more things...
- Two strong batteries
- And corrosion free cables
are needed to give that monster under the hood all the spin that it needs to fire every time.
Batteries need to be in the 800CCA range ideally. 1000CCA is better. Below 800 will get you by for a while, but more is better and usually the higher the crank rating, the better the quality.

If you haven't ever changed your battery cables, then you'll want to now. Even more so since you're having starting problems. You can clean them up, and they may look fine but corrosion may likely have creeped up under the insulation where you can't see it. Buying quality cables can be a real shot in the pocketbook but going cheap will just mean that you will be dealing with the same problem very soon, and a quality set will last many, many years so it'll be cheaper in the long run. Bite the bullet and get the good ones.
Some of the best on the market are hand made by Bruce at PT Wiring solutions, we cover a full install of them here.
First, The Troubleshooting
So you're in a no-start situation. It just clicks when you hit the key or turns over very slowly.

- The first thing to do is load test your batteries. You can pull the battery out and take it to a shop or auto parts store but it's better to just get a load tester for yourself. They're cheap (about $20 in 2018), simple, easy to use, and will last a long time if you take care of them.
- If your batteries test out ok, next check all the cable connections. Disconnect them from the batteries and take a wire brush to the terminals and the cable ends and put it all back together.
- Make sure the batteries have a full charge and see if she starts. If not, we still have to check the connection at the starter, but that takes the same amount of work as beginning the starter change so let's go ahead.
Gather Your Things...
|
Tools: |
Parts: |
Material: |

- Always step one, safety first when you're climbing under the truck so jack the truck up and put some good jack stands underneath. Safety is just a numbers game. The more you try to get away with unsafe stupidity, the quicker it'll get you. And having your rig falling on you is something most of us will want to avoid.
- This is one job that you will definitely want to disconnect the negative battery cables. There is no way to do this job without it.
- Pull the wheel off and set it down right by the hub so you can use it for a seat. Now you're nice and comfy for a sometimes not-so-fun job.

- Here is the key to making this job much easier, remove the inner fender well. It will give you all the access that you need to reach everything for an easier starter install. If it hasn't been taken off for a while (or ever), you may have to really work at it but it is well worth it. Not just for this job but also if you ever need to get to your turbo in the future or even changing your glow plugs or injectors, it makes it a LOT easier.
14 13mm bolts, a couple nuts and one little 7mm or 1/4" guy down by the front bumper will loosen it up. Now just take your time and start to work it out. I started with the front. Pry it past the ledge that it's resting on and that will give you more room to work on the back. You'll want to wear some good work gloves for this because the fender well metal is thin and it's pretty easy to cut yourself on it while your dinking around to get it out.
- The last thing to do to make this job easier is to pull your down pipe off the turbo. Again, if it hasn't been off for a while, it might be a bear but it'll be worth it, believe me.
By the way, the absolute best penetrant you will ever use is called Kroil. It's spendy at first, but you only need a little tiny bit compared to any of the others so it'll actually last longer and be cheaper in the long run.

My dad had cans that were falling apart because he had them so long working on airplanes and all the rusty crap growing up in Alaska.
- Now take just a minute to look around for anything that may need attention. You don't get down here often so this is a good time to catch anything. On mine, I had an exhaust manifold bolt completely loose, a glow plug wire pinched by my downpipe and the connector had come loose from the glow plug, my lower radiator hose guard spun so the frame where the hose rubs was wearing through, I saw some coolant that made me poop a little thinking about leaking head gaskets that turned out to be the hose at the crossover where I removed that crap quick-connect, and a few other little things. So look around and take the time to fix it all now.
- Check your glow plug harness and all the connectors too. Replace that harness with Bruce's set from PT Wiring Solutions.com. There's no better set out there.

-Side Note On Rust Treatment-
There are a lot of products out there that work well, Navel Jelly is one that I've used. But there is one that I had quite frankly forgot about until my dad reminded me of it. As an AI mechanic, he has used Ospho for years on the old frames of the airplanes that he works on. One thing that I like about it is that you can just put it in a regular spray bottle and spray away.
It's super easy to apply and within minutes, you'll see the rust start to turn black. After a while, a white powder will form and I just use a 3M scuff pad to knock it off, then prep for paint as needed.
It's got an odor to that that I don't personally find too bad and it is an acid so you'll have to be mindful of that but I've never had any problems with it.
You can get a gallon of it pretty cheap here.
Tip!
Test your glow plug relay and plugs now! While you've got this thing pulled apart, use a test light between the connector and the plug. If they are bad, replace them with Bosch Duraterms.
It wouldn't be a bad idea to get your injectors tested and cleaned as well. John at Quadstar has brand new Bosch injectors and you don't want to go with anything else. So if you have the time, pull that turbo off and get everything done now.

- Ok, you're ready to get going on the starter. The first thing is to remove the 16mm nut from the battery cable. It's pretty tight down in there with not a lot of room to wrench the nut off even with a gear wrench so I daisy chained two long extensions to a short, wobbly extension and came in from the front of the truck along the frame rail. Easy peasy.


I Hope We Helped You Somehow. If So, A Like Sure Helps us!
- Pull the cable out and clean it and the stud up good. Now it's a long shot but put the cable back on, tighten it up and go see if it starts. It's not real likely but if a bad connection right at the starter is all it was, it would be a real shame to go through any more trouble.
- Ok, she didn't start. Pull the cable back off the starter and pull it completely out of your way.

- Now you have room to reach the starter bracket. You DO have a starter bracket on the back, don't you? If not, you're lucky that you haven't ruined your motor by breaking the bellhousing area from the weight and vibration of the starter. You absolutely need that bracket. They're cheap at around $17 (2018) so get it and use it. Mine was broken completely in half so I didn't need to mess with it to get the starter off. I'm so glad that my starter went bad now so I caught it in time! An 11mm wrench will get it off.
And by the way, the bracket bolt into the block is 8mm x 1.25mm, 20mm long, the nut holding the bracket to the starter is usually 1/4"-20, and the starter bolts themselves are 10mm x 1.5mm, 4.5" long. Thanks go to reader Mark Taffin for getting on my butt to add these details, thanks Mark!
- Pull the little 7mm nut off of the starter switch wire and that will be it for this end of the starter. With so little room in there to turn a wrench, you'll just have to go a little at a time. A gear wrench is always awesome in times like this. And I always have an extendable magnet handy. You WILL drop stuff.

- After all that, you're ready to climb down below.
- Down here, all we have is the two 15mm bolts to remove. But hold on a second...
On my 5 speed truck, I had the clutch slave cylinder to maneuver around. After trying for several minutes at every angle to get the starter past the slave cylinder, I figured that it can't be done without serious possibility of breaking the slave, or jerking the line out. Time to pull the slave loose. Just remove the two 13mm nuts and pull the slave back until you can get the rod free of the bellhousing. It won't just fall out, but be careful and do NOT pull the rod out. And for the love of God don't push the clutch pedal in even a little while this is out, you'll have a whole new mess of repairs to do. We'll come back to this in a minute.


- Now you can remove the two 15mm bolts and lower the starter down.

- I pulled one bolt all the way out, loosened the other almost all the way out, then held the starter with one hand and removed the last bolt by hand.
- Push the starter towards the front of the truck and up on that end, then nose it down and out. You'll have to wiggle it around a bit, but it should come free pretty easily.
- OK! You've got the starter at your feet. Personally, I couldn't resist seeing what it would do outside after so much trouble in the truck, so I wanted to test it. With jumper cables hooked to a battery, attach the negative to the body of the starter somewhere. A good starter can jump right up off the ground so put your foot on it to hold it down and touch the positive to the battery stud on the starter for just a second.
It should BANG the gear right out and start spinning like mad. Mine... not so much. More like a flub and a grudging, slow spin without the gear coming out at all. Confirmed - bad starter.
- Go get your replacement and lets put her in.
-Side note on your starter choice -
You'll get a lot of opinion on what starter you should use. And you've probably found that the truck world is full of real jackasses that think that their opinions and personal experiences make them an absolute authority on what's best for your truck. Well, different people need different things for different reasons. I know, real genius level stuff there, right?
I'll tell you this, although the starter that I mentioned at the top of this article from Quad-Star Tuning seems to be the best starter for our trucks, I don't have one. Yet.
I have a lifetime warranty starter from O'Reilly's and here's why...
I'm often on the road quite a bit for work, so I needed a starter that I had a good chance at being able to get replaced quickly no matter where I was at. O'reilly's are all over, NAPA is good for that too, maybe better. I've seen NAPAs in the tiniest little burgs all throughout the western U.S. where I travel. With the lifetime warranty, I walk in (with my receipt), hand them my bad one and walk out with a new starter. Quick, easy. I couldn't do that with another starter. Some day when I can afford to have my truck down for a longer time, I will go with a better starter. But right now, I got three years out of that last one and that's good enough for me.
So get the starter that you can afford, and that fits in with your particular situation right now. Just understand that cheap means cheap and you'll likely be doing this again if you go that route, so get the good starter if you possibly can.
End Rant!
Prepped For Install
Ok, time for install!
- Put your new starter bracket on the block if you got one, or just have your old one snugged up a bit so it'll rotate. Again, don't ever run your rig without one.

- Have your new starter bolts handy and climb below and push the starter up studs first past the slave cylinder and work the nose back into the bell housing where it goes. Get a bolt started and then relax your arm a bit.
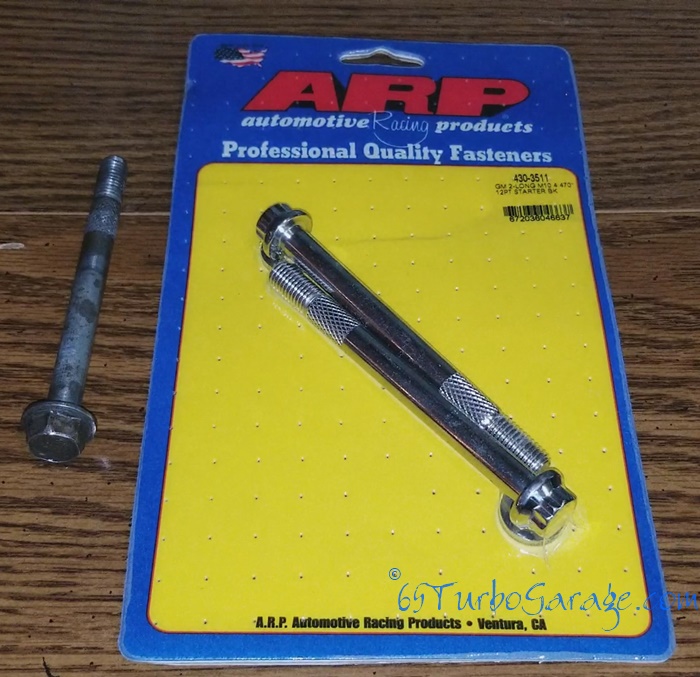
-Side note on starter bolts -
Starter bolts are a wear item. That means they wear and need to be replaced. There are knurls after the threads that help to align the starter so it seats correctly. The threads themselves can stretch over time as well which can cause them to break the next time you change the starter or even right now when you're trying to put your new starter back in. And believe me, as far as problems that you can cause for yourself are concerned, this isn't one you want.
Leroy at leroydiesel.com has a set of the best bolts that you can buy. ARP starter bolts are made with the best stainless steel, will last longer, and will hold better than any other bolt. They will wear out over time, but not for a long, long time. They'll likely be the last bolts that you will have to buy for your starter.
If you don't want to or just don't have the cash for the ARPs, at least get a new set of stock bolts. Don't re-use the old ones if they haven't been replaced.
- Ok, go ahead and put the other starter bolt in and snug them both up a bit. You'll definitely want to use some anti-seize on these. But don't tighten them yet.

- Up top, lift the starter up a bit and rotate the bracket onto the stud and put the nuts and washers on and tighten down to 75 INCH/lbs on the nut (or about 6 ft/lbs) and 24 ft/lbs on the stud in the block.
 Starter Bracket Fully Installed
- Put your battery cable back on the big stud and tighten it down. Sorry, I don't have torque settings, just get it tight.
- Slide the small starter switch wire onto the little stud but then go down below and reach up to get the nut and washer on the stud, it's much easier than trying to get it from above.
- While you're down there, go ahead and tighten up the starter bolts to 34 foot lbs if you're using the stock style bolts and 54 ft/lbs if you're using the ARPs.

Now, back to the clutch slave...
- Like I showed in the video above, there is a large bolt that is in the side of the bellhousing where the clutch slave cylinder mounts. Remove it and it will allow you to see right in to the clutch fork. It's made of aluminum and likely has never been removed, so use a socket that isn't wore out to pull it off. Go buy a new socket if you have to, you don't want to tear this up.
- With it off, you can see the dimple in the clutch fork that you want the rod to set in. Put a little grease on the rod and work it back up into it's hole.
- Make absolutely sure that the rod is in the dimple and put the nuts back on and tighten them down to 13 ft/lbs. You don't want to get this cockeyed, it could break stuff, just ask Will. : )>
- Now, back up top, tighten the starter switch wire down and sit back to get a good look at your new starter! No big deal, right? : )>
- Before you finish buttoning everything back up, go jump up in the seat and see if she fires up. If she doesn't fire right up, you need to look at your fuel, glow and battery system.
But for now, go ahead and start putting it all back together starting with the inner fender. I started with lifting the back end up into the area it goes, then worked the front up, prying it past the one spot that it got caught up on. Pulling the air cleaner really helped because I could see what was in my way up there, after that, I just wiggled one bolt hole into place after the other and started a bolt as I went along. And by the way, use anti-sieze! You want these things to be able to come out again some day.
Put your air cleaner and wheel back on, lower it down off the jack stand, get a good look at your running rig and go drink a beer! (You are doing this work on the weekend, right? We only drink after 5PM on the weekends.) : )>