Fluidampr Install
Complete catastrophic failure of your 6.5 turbo diesel is almost certain from a broken crank if you ever experience a failure of your harmonic balancer (or vibration dampener). The Fluidampr install is another life-long install that will prevent that failure from ever happening for the life of your engine.
Every power stroke causes a small amount of twist in the crank in a four cycle engine. At running RPM, this small amount of twist translates to harmonics up and down the crank. You can see how thousands of miles of this twisting can weaken a crank much like bending a wire back and forth over and over will cause it to eventually break.
On one end, these harmonics are dampened by the weight of the flywheel on a manual transmission equipped vehicle and the torque converter on an automatic. On the other end, a heavy weight is mounted behind the crank pulley (which also acts as a dampener so be sure to check its condition as well) to further dampen harmonics to a level manageable by the engine for thousands of miles.
The factory vibration dampener is made of rubber and steel and will last for many thousands of miles. However, the rubber will deteriorate over time and will allow harmonics to weaken and eventually destroy your crank and therefor your engine right along with it so be sure to check for any cracks, pieces missing or any other defects. The fact is, if it has never been changed it likely needs to be, considering the age and miles on most of our trucks. Also, the factory dampener is tuned for a stock motor running at relatively low RPM. Any time the rotating assembly is upgraded or the RPM potential is raised as when adding more power, the stock dampener is no longer as effective. For me, the fact that it will last the life of your engine and beyond without fear of failure was reason enough for me to make the change.
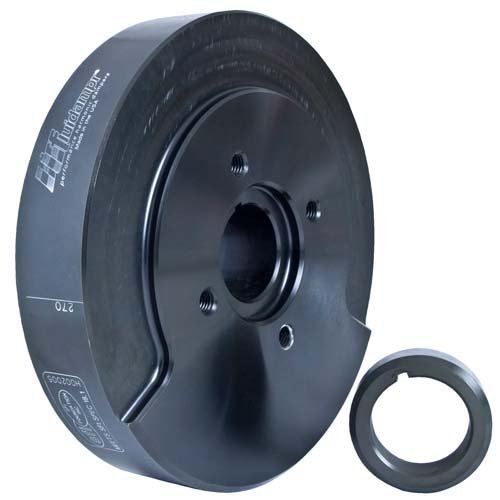
The Fluidampr Solution
Fluidampr technology has been used since 1946 in large heavy duty engines. Adapted for gasoline (and diesel) engines in 1985, they are still made in the U.S.A. and are considered the best vibration dampener for everything from a rock solid daily driver to a full tilt race car.
Far superior to the factory dampener, the Fluidampr will dampen vibration harmonics at any RPM and last the life of your engine. Potentially saving you thousands of dollars from a complete engine failure and lasting a lifetime is a rock solid investment for your truck.
And So We Begin
|
Parts: |
Tools:
|
Cleaner/Sealers: |
This install can be done with the engine in the vehicle so we will start from there. If your engine is already out, then just skip ahead in the procedure to the point of install.
- Remove negative battery terminal(s) if you ever need to remove any electric wires (every vehicle is different) - 10mm/ 3/8” (this is a good time to clean them with a wire brush and spray some anti-corrosive on)
- Remove fan shroud assembly - 10 mm/ 3/8”
- Remove fan belt and fan. Tensioner – 18mm (Check your belt for cracks. Replace it if it’s worn. It’s pretty cheap insurance) fan – 13mm/ ½”
- Remove pulley – 15mm / 5/8”. You may have to work it a bit if it’s been on a while, but it shouldn’t be too tough. A rubber mallet may help.
- Remove dampener bolt – 24mm/ 15/16”. This bolt is on at 200 ft/lbs and has most likely been there a while so there is no substitute for leverage! (Or an impact wrench if you’re doing this out of the vehicle) A good breaker bar will have it off in a hurry. Don’t forget to set your parking brake and keep it in gear/park to hold the motor from turning over.
Tip!
If you need to really lock that motor from turning, here's a way that we call the Faddis Maneuver. Used for taking off, or putting on, if you're doing this job with the motor in the truck, this'll git-er-done!
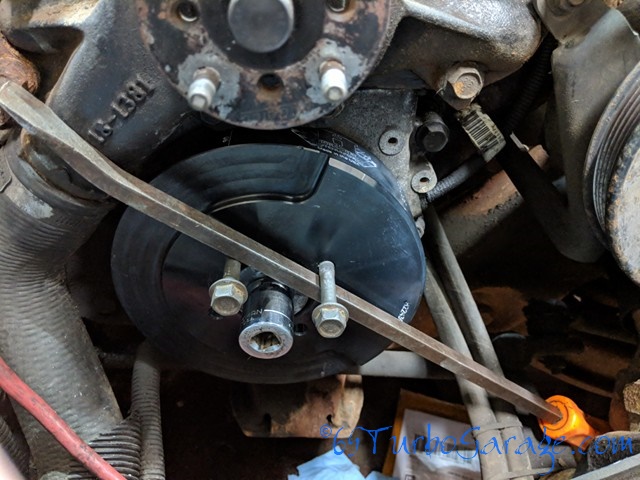
- Finally, using the harmonic balancer puller, remove the dampener.
One time Deal... Get The Details Right...
Things are likely pretty nasty down in there if the engine has many miles on it so go ahead and take some time to clean up a bit, it’ll be worth your time and since the Fluidampr is a lifetime change-out, you’ll want to change the front seal while you’re in there and you don’t want anything getting in the engine while doing that. Just some Brakleen and rags is all it should take for the most part.
- Remove Front seal
- Make sure the surface of the crank where the seal makes contact is in good shape. Smooth out with sandpaper if necessary.
- Install the seal. I could not find a seal installer with the correct 16x1.5 mm threads so I just put a 2x4 over the seal and used a large headed mallet to slowly and evenly tap the seal in place. The key is to get it started straight to begin with. If it starts crooked, you’ll have a harder time getting it to straighten out as you tap it in and will likely warp the seal body which will result in a leak. The open end of the seal faces the inside of the engine. Coat the inside seal lips with oil before installing.
- The Fluidampr requires the use of an install tool. Do NOT use a hammer to force it on. The fit is much too tight and you will void the warranty.
- Make sure the entire surface of the crank is smooth. Use sandpaper to smooth out if not. Make sure that you don’t create any flat spots.
- The key is pretty soft metal. Smooth any jagged spots on it if it got smacked at any time. Make sure that it is still a snug fit afterwards.
- Coat the crank with anti-seize
Ok, Let's Get 'Er Installed!
 Harmonic Balancer Install Tool
I couldn’t find an install tool with the correct threads so I made one. It worked fantastic. I made a few more if you want one.
- Slide the spacer that came with the Fluidampr onto the crank. If you have a reluctor wheel for the crankshaft position sensor, you won’t use this spacer.
- Put a small amount of RTV on the key. Just enough to hold it in.
- Aligning the slot with the key in the crankshaft, slide the dampener over the crank. The dampener has a larger diameter for about ½” or so that will allow you to easily slide it on and rest there.
- Thread the install tool stud (A) into crank. Thread it in all the way.
- If you’re using my install tool, slide your big damn crank washer on then a small washer from the install tool.
- Slide the install tool bearing and the other small washer over the stud.
- Thread the install tool nut onto the tool.
- Using a 15/16” wrench or socket, tighten the nut to push the dampener onto the crank. With this install tool, it will turn very easily but will get pretty tough towards the end. If the engine is out of the truck, you’ll want to also install a flywheel lock to prevent the engine from turning over while tightening the install tool. I made a few of these too and will sell you one if you need it. Tighten the nut until it comes to a complete stop. You’ll have to put some pretty good torque on it but you will feel it seat.
- Loosen the nut on the install tool and remove the tool from the crank.
- Thread the dampener bolt with washer into the crank and torque to 200 ft/lbs. I should say that my factory service manual is pretty confusing here. In the procedure, it states to torque to 85 ft/lbs which seems a little light. Later, in the fastener tightening specs, it says 200 ft/lbs which seems about right so I went with that. You’ll have to decide and I will post here if/when I ever find a straight answer.
- Reinstall pulley. Torque to 35 ft/lbs.
- Reinstall belt, fan, fan shroud and battery cable.
Finished!
Congratulations! You have just performed a mod that will add a lot of life to your engine, allow it to run smoother and allow you to safely add more power mods to your engine.
Now, on to more power!